


It was incredibly simple. We used this for the basic idea:
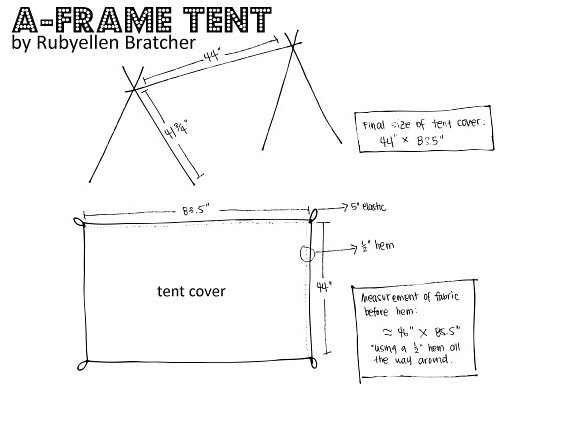
I'm not sure if that tent was more for show or for more careful children, but there was no way that would be sturdy enough for a quick and clumsy nine month old to be crawling around near. Instead of one dowel down the top and center, we used three. Two across each side for an extra support. We also used another piece of wood for a back support. and instead of screws and nails, added more holes and placed it on the inside of the structure--- without this piece the tent legs would have been constantly falling and moving out of place-- no matter how tight the dowels were in place. We also added two screws (the only screws we used for this project) at the very top (in front) and wrapped thin rope to hold the front legs in place, to keep them from sliding. For the tent cover: I used a vintage table cloth that I found while pregnant at a consignment store down the street. I had been (impatiently) waiting for the perfect project to use it in my home. Instead of elastic to hold the cover in place, I opted to sew fabric ties to hold the tent in place, which gave me a nice opportunity to hide the extra dowels :) Simple enough: a really brilliant idea, tweaked and turned into a 100% more sturdy, beautiful structure.
By the way, when I say "we" I mean: "Eric". He did the measuring and hole drilling. I did the ocd picking and choosing and fabric cover. BUT, if I had the wood tools he has, I totally could have done this myself. But its a ton better with both of us working on it, dontcha think? :)


string to hold the front legs from sliding

a little sewing mishap

an extra back beam

extra dowels along the side, for extra support. nicely hidden away.

I love it.
It was definitely a good weekend. I'm also incredibly pleased to say I was also able to finish some other small handmade gifts and items, along with this bigger project. There was lots of yummy (not so healthy) food and finally some sunny weather. I hope you all also had a wonderful weekend :)
It was definitely a good weekend. I'm also incredibly pleased to say I was also able to finish some other small handmade gifts and items, along with this bigger project. There was lots of yummy (not so healthy) food and finally some sunny weather. I hope you all also had a wonderful weekend :)

♥

No comments:
Post a Comment